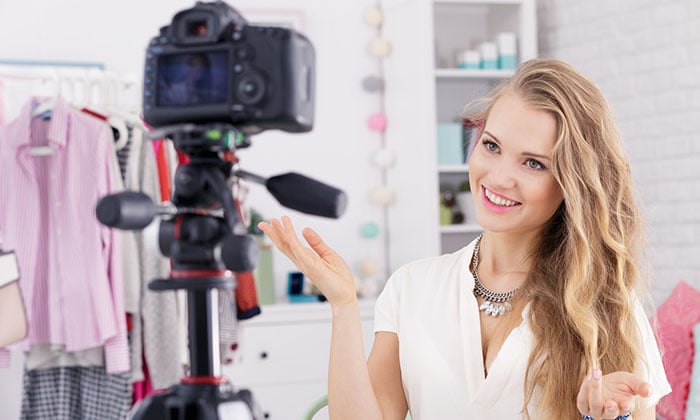
If I told you that you could become a sucessful vlogger, would you believe me?
Or do you think that there is too much competition?
YouTube is saturated — 500 hours of video are uploaded to YouTube every minute. There are dozens of million-dollar YouTubers creating thousands of hours of video a year.
How could you possibly break through the noise?
Well, I’m here to tell you that video blogging still has huge potential.
Just look at the growth of video ad investment among brands and agencies and where it’s predicted to go:
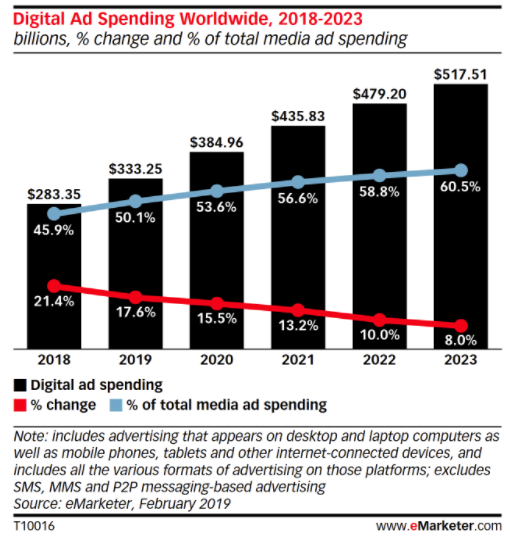
Investment is growing because it’s following consumption. More than 85% of US internet users watch video ads.
It might not be as easy as it was five or seven years ago to break onto the vlogging scene, video is more important than ever to build a successful online marketing strategy.
Why?
First, video remains one of the best and most effective ways for people to get to know you.
When they see you, their brain develops an impression of you that helps to build trust. You’re not just an anonymous content creator trying to drive your business. You’re a real person.
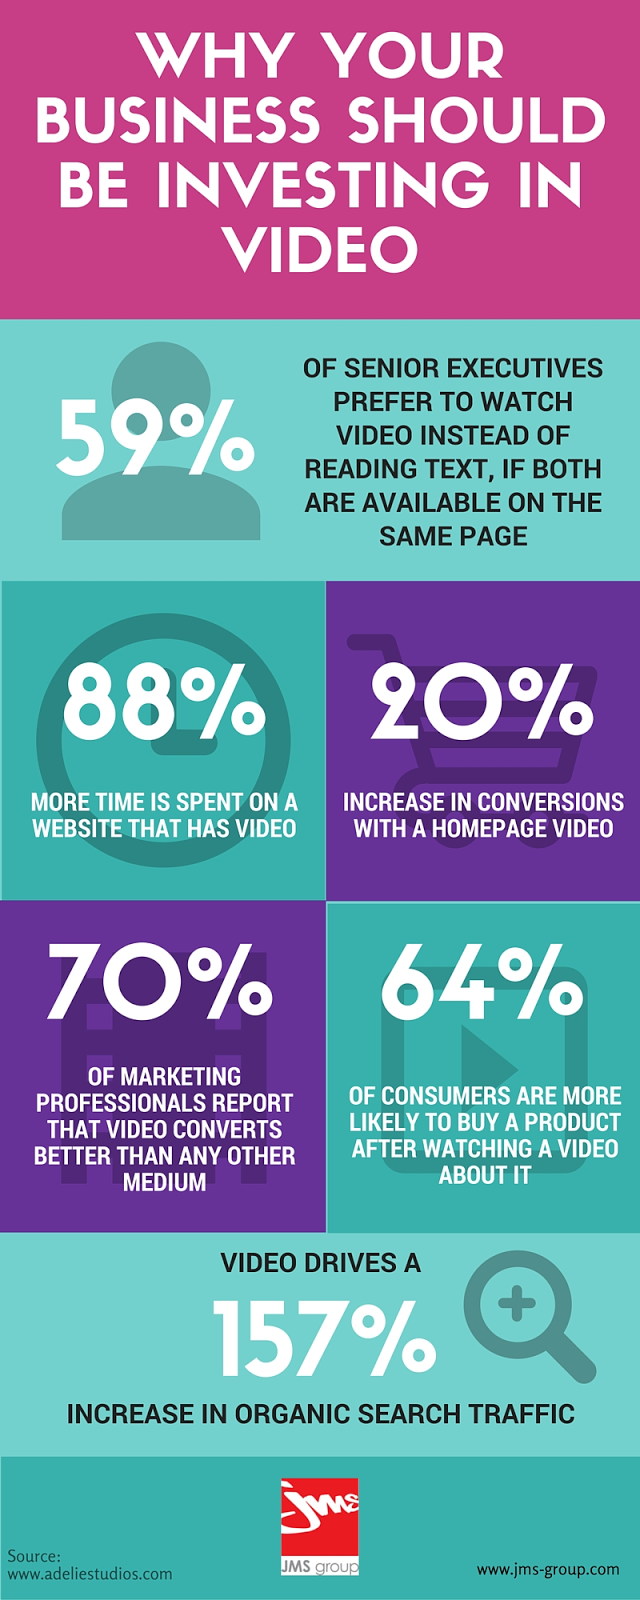
Second, video is a preferred method people have for gaining information. The stats don’t lie. People spend up to 2.6 times as long on web pages with video than without video.
Third, the cost of good equipment keeps on falling, and the cameras in our phones keep getting better.
Fourth, video has a strong impact on the user experience, and therefore SEO. A video on your site can increase organic traffic by 157%. Check out this infographic:
Finally, video blogging can be lucrative in itself. The top YouTubers make between $14 and $22 million dollars a year.
The power of video is undeniable.
All of this brings up the question: how can you become a successful vlogger?
I’m going to explain the steps you need to take to become a successful vlogger, from starting a vlog and coming up with concepts for a video series to making a quality video and making sure people find your videos.
Let’s jump in.
How to Come up With a Concept for a Series of Videos
Many people follow the desire to make a video by coming up with one idea for one video.
That would be like starting a blog with an idea for only one article.
As you probably know, that wouldn’t get you very far.
I explain how long content marketing takes in this video:
Video, like any other form of content marketing, needs a long-term strategy defined by a subject, tone of voice, and approach.
Here’s a question to ask yourself:
“What am I trying to convey to my audience?”
Once you know what you’re trying to do, you can define your vlogging content concept:
- What should the format be? Should I do screen capture demos of step-by-step instructions? Should I be out and about talking to people? Should I talk into the camera?
- What can I do with video that I can’t do in other formats like the written word?
- How often am I going to make videos? How much time can I dedicate to them?
You have to document your plan to determine if it’s going to be feasible for long enough to achieve your goals.
The reality is people need to see consistency in order to understand why they should subscribe to your channel.
If you are making random, sporadic videos, it’s going to be harder to convince people to follow you.
The content of your video will be what determines your success.
That is, of course, only if you make quality videos.
How to Create Quality Video Content for Your Vlog
Video making is a complicated profession. When you see all of the elements that go into shooting a television broadcast or feature film you can be forgiven for thinking that you could never make anything like that.

And you probably can’t.
That’s OK.
People who are going to watch your video on your blog are not expecting a Steven Spielberg production.
People understand what vlogging is.
But that doesn’t mean that you should not care about quality. Quality is still super important.
Luckily, the cost of creating quality video has been steadily dropping and continues to drop. There are more and more types of equipment available that can make your video go from amateur to professional-looking.
Step 1. Get a Camera and Tripod
You might be tempted to use your iPhone.
And honestly, cameras on smartphones have gotten amazing over the years. You have probably taken some great photos and videos on your phone already.
But smartphone cameras are difficult for serious video blogging for the following reasons:
- They are hard to mount properly
- They have very limited field of depth
- They have very limited exposure options
- Sound sucks
Selfie videos are best used for things like Instagram Stories.
They can be a part of your video strategy but shouldn’t be the foundation of it.
Cameras range in quality a lot, from basic models that run in the low hundreds to professional gear that can cost tens of thousands of dollars.
Most DSLR cameras also have video modes, though the options can be just as limited as on smartphones.
If you don’t know, DSLR cameras look like this:
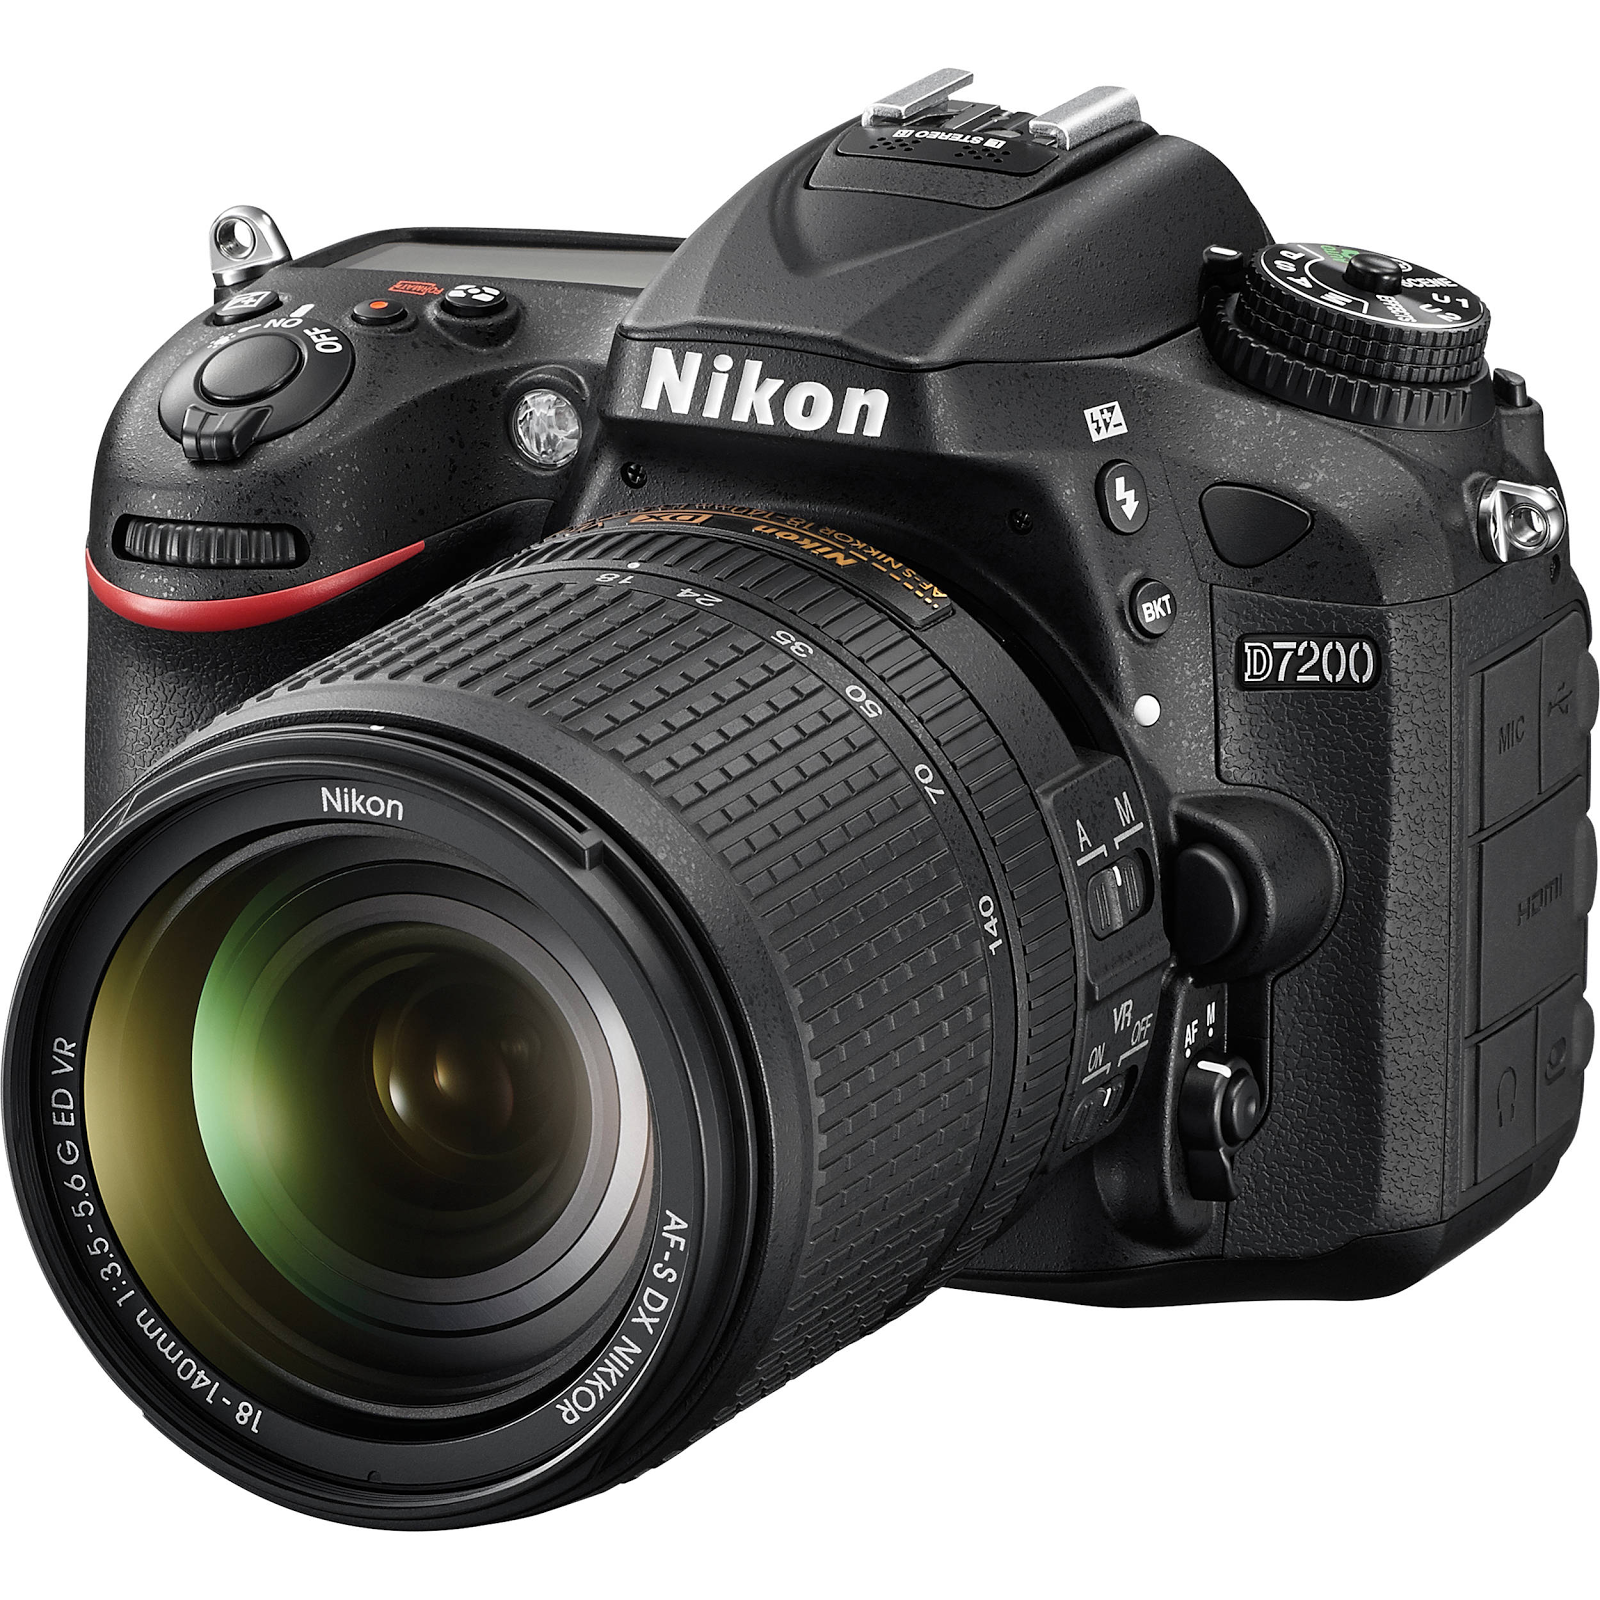
The good news is that if you’re not chasing snow leopards in the wild, you won’t need all of those fancy settings.
What you need is a camera with a good lens that’s can take high-quality video. Not 4K necessarily, but enough quality to be able to work with if you want to add any extras.
You can find refurbished HD digital video cameras like this one for under $200.
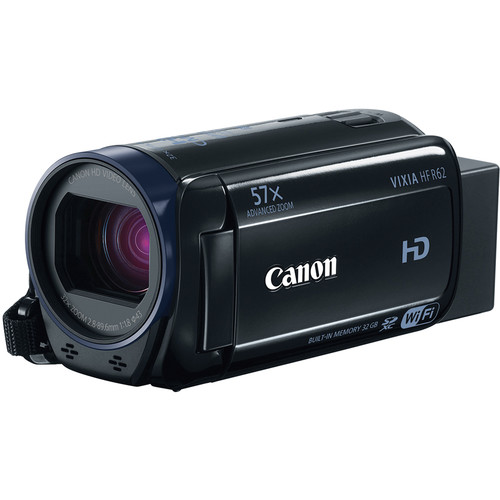
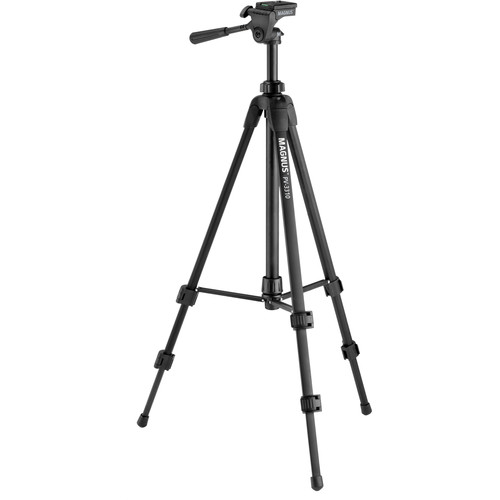
Then, mount that camera onto a tripod. Nothing is worse than shaky video.
You could always place your camera on a table or shelf, but tripods are very affordable and give you 100% control of your filming.
Full-size tripods can go for less than $20, so there’s really no excuse not to have one.
Step 2. Get a Microphone
You can either get a camera with a mic-in jack to plug in an external microphone (something you can also do when filming with your smartphone), or you can buy a USB microphone and record the sound directly to your computer.
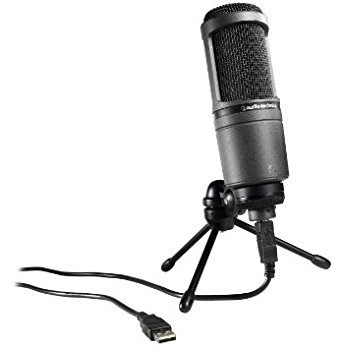
It depends on the type of conditions you’re filming in, but you usually don’t want to capture sound from directly from the camera.
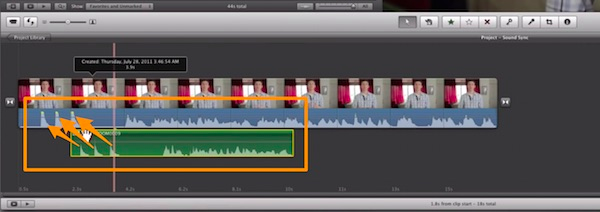
Separating the recording between two devices adds the challenge of having to sync up sound and image later.
You can overcome this by creating a clap sound that spikes up your audio visualizer for each syncing, then you line that up with the audio from the video.
I can’t stress the importance of having great sound in your videos. Sound is one of our fundamental senses and it should be a part of your marketing strategy.
Here are a few ways to leverage the power of sound:
Simply put, poorly recorded audio can turn people off and get in the way of you getting your message across.
Step 3. Create Your Lighting Setup
Lighting videos is an art all unto itself. But it’s surprisingly easy to get a great effect since there are normally only three primary lights in a video setup.
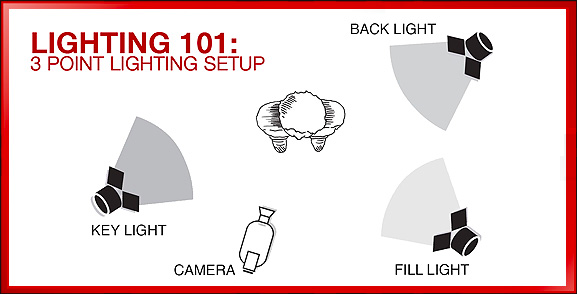
The important thing is to separate yourself or your subject from the background. You can do this with the focus and depth of field, of course. But it really looks professional when there is a difference in lighting as well.
You don’t even need a professional lighting setup.
You can create a fairly decent lighting setup from lamps that you might have around the house.
You can also buy LED board lights that diffuse really well without getting hot — one of the drawbacks of using incandescent bulbs. You can buy versions that you can mount on your camera if you aren’t shooting in a controlled environment.
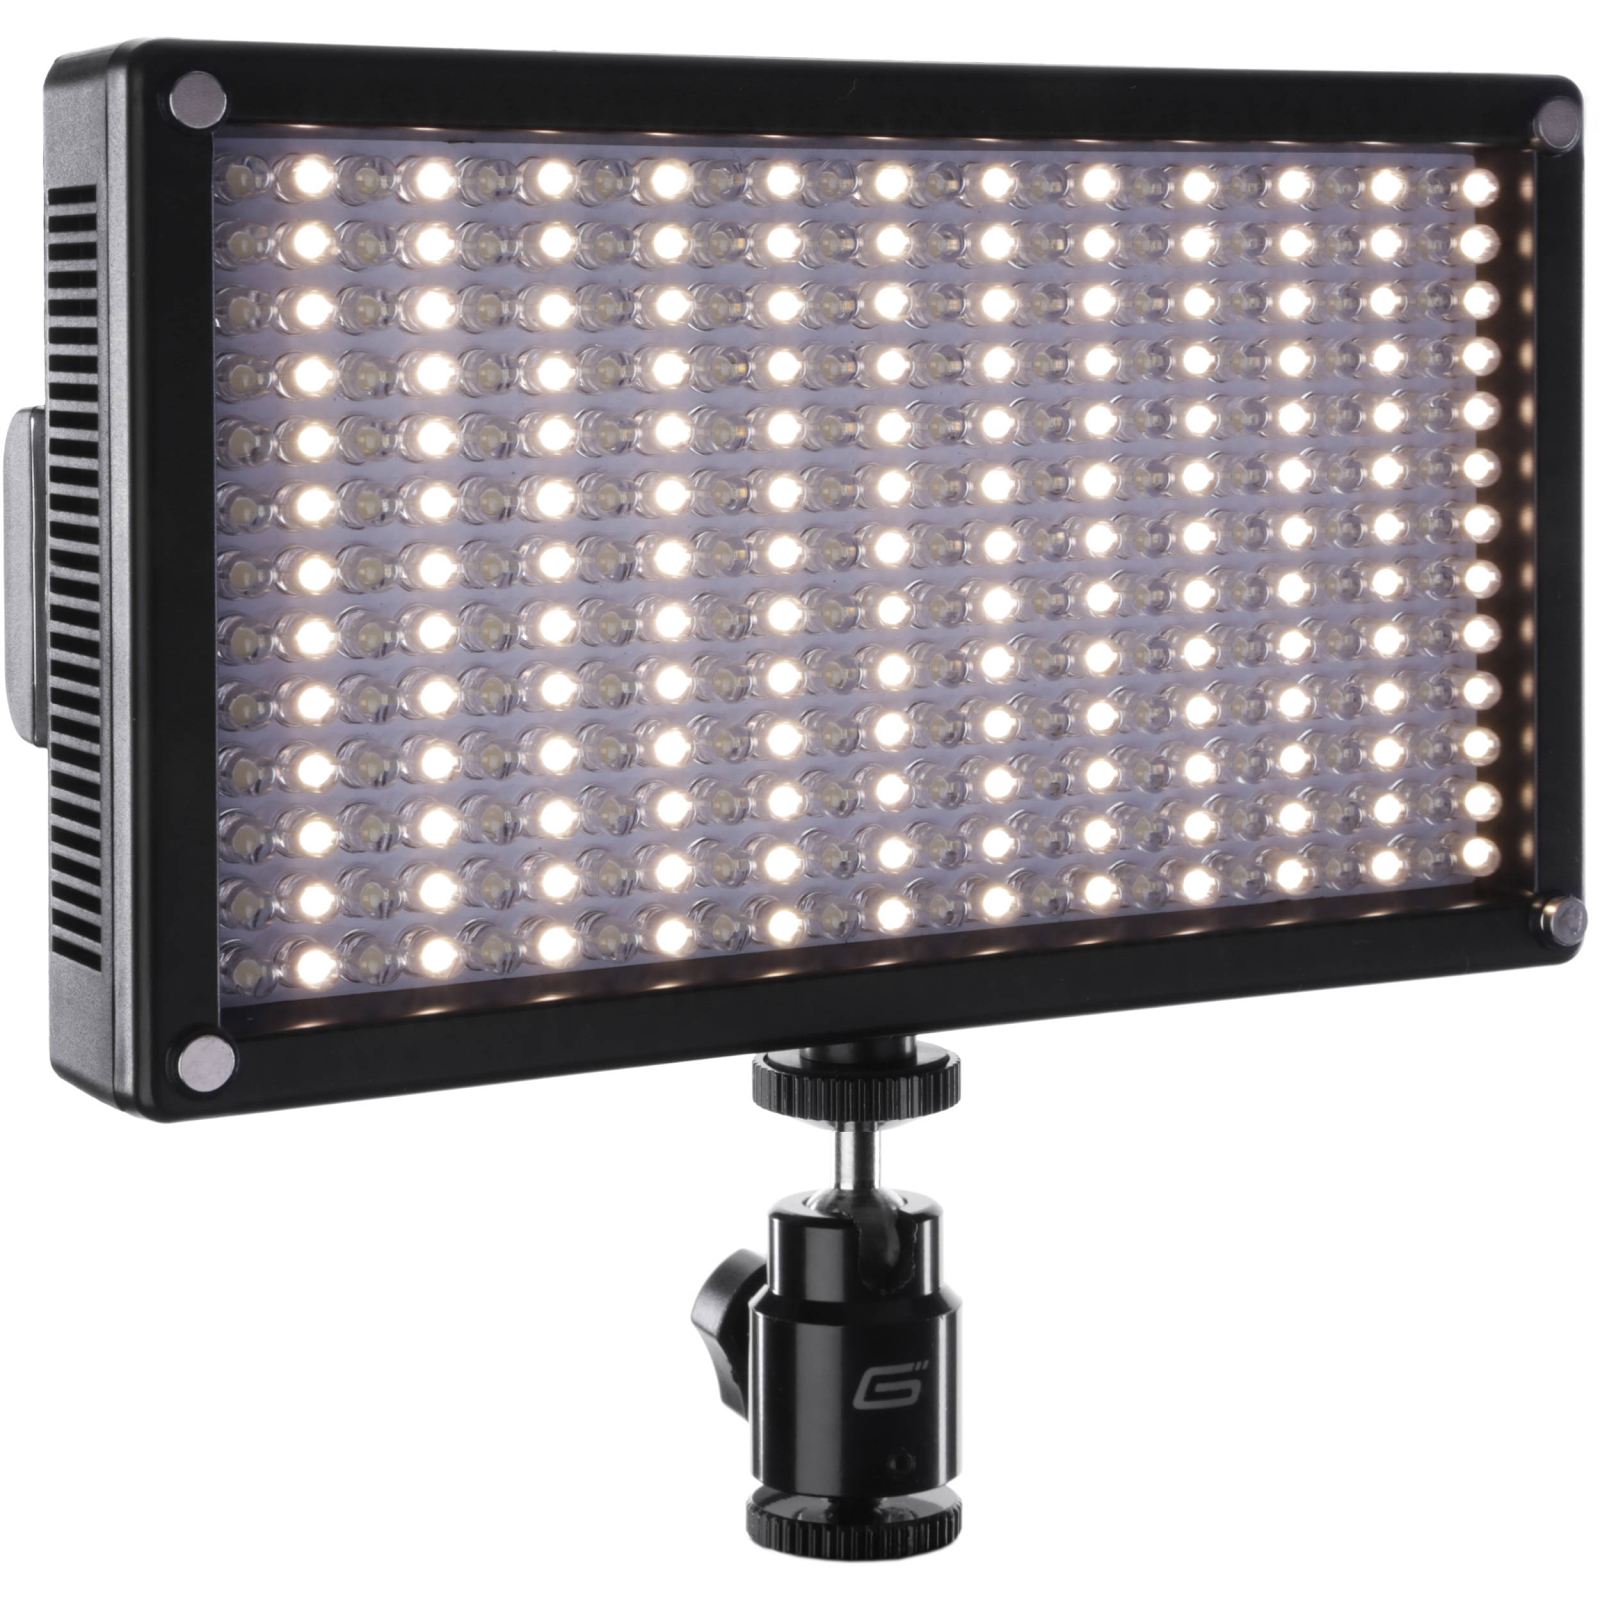
As a general rule, it’s better to be brighter. The image is clearer since the camera captures more light and therefore more detail.
Step 4. Get a Teleprompter
It’s great to be able to speak off the cuff effortlessly. There are some vloggers with a natural style that works really well. Take the beauty vlogger Freddy My Love. Her effortless and natural style has been honed from years of practice.
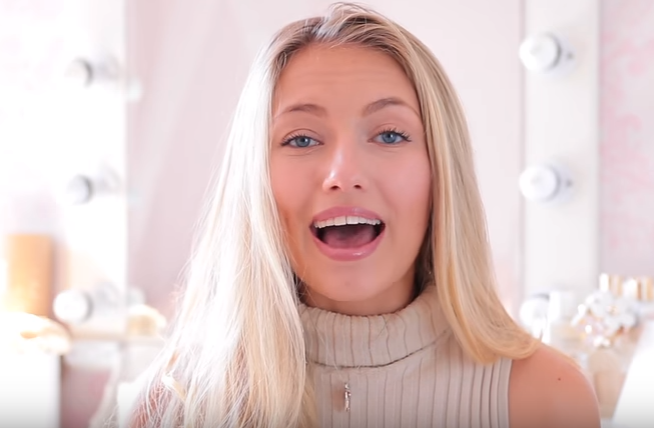
Chances are, you will need help to deliver content in a clear and structured way.
You could memorize talking points and do a couple of takes. Then you can splice together the best parts.
That’s a longer process, though, than using a teleprompter.
A teleprompter makes it easier to hit all of the important points without memorizing or awkwardly transitioning between them. You could even write a script to follow verbatim.
But it’s more than a time saver. It drastically improves the way that you interact with your viewers.
Having notes or something written off screen causes you to break eye contact when you’re addressing your audience directly.
According to a study by Cornell University, humans will naturally increase eye contact with people that we admire or like.
Conversely, we tend to break eye contact when talking about embarrassing or uncomfortable subjects.
Viewers will subscribe to vloggers they respect. You can look directly into the eyes of your viewers while still reading your script or bullet points.
A teleprompter might seem complicated, but it’s actually pretty simple.
Teleprompting uses a slanted piece of glass to reflect the words so you can read them.
As long as there is darkness between the glass and the camera lens, the camera won’t pick up the light reflecting from the text on the glass. The camera will only see you.
You, however, will be able to clearly read the text as it scrolls. It looks like this:
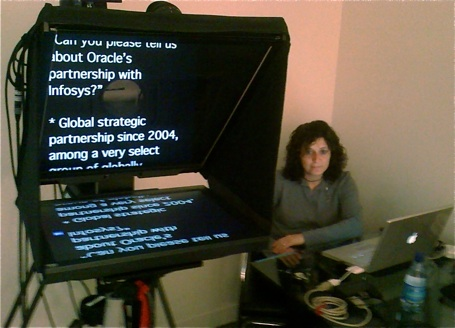
You can buy a teleprompting setup and use your iPad or tablet with a teleprompting app.
There are also more advanced models that hook up to pedals for your feet that control how quickly the text scrolls.
If all that sounds like way too much, you can always try to build one yourself with a CD case and your smartphone to see if you like it.
Step 5. Do Your Makeup
This might sound a bit controversial – and I’m OK with that because I want you to have all of the options available to becoming successful – but people like watching videos with people who are put together.
(This explains why so many movie stars can be bad at acting.)
You don’t need to be Brad Pitt, and you definitely shouldn’t go overboard, but make an effort.
You’ve got an HD camera and a lighting setup. People have never seen you as clearly as right now.
For example, when you light yourself there will almost certainly be shiny parts of your skin. That’s your natural skin oil.
The most common makeup is a powder that absorbs oil so that your skin appears smooth without reflecting too much light.
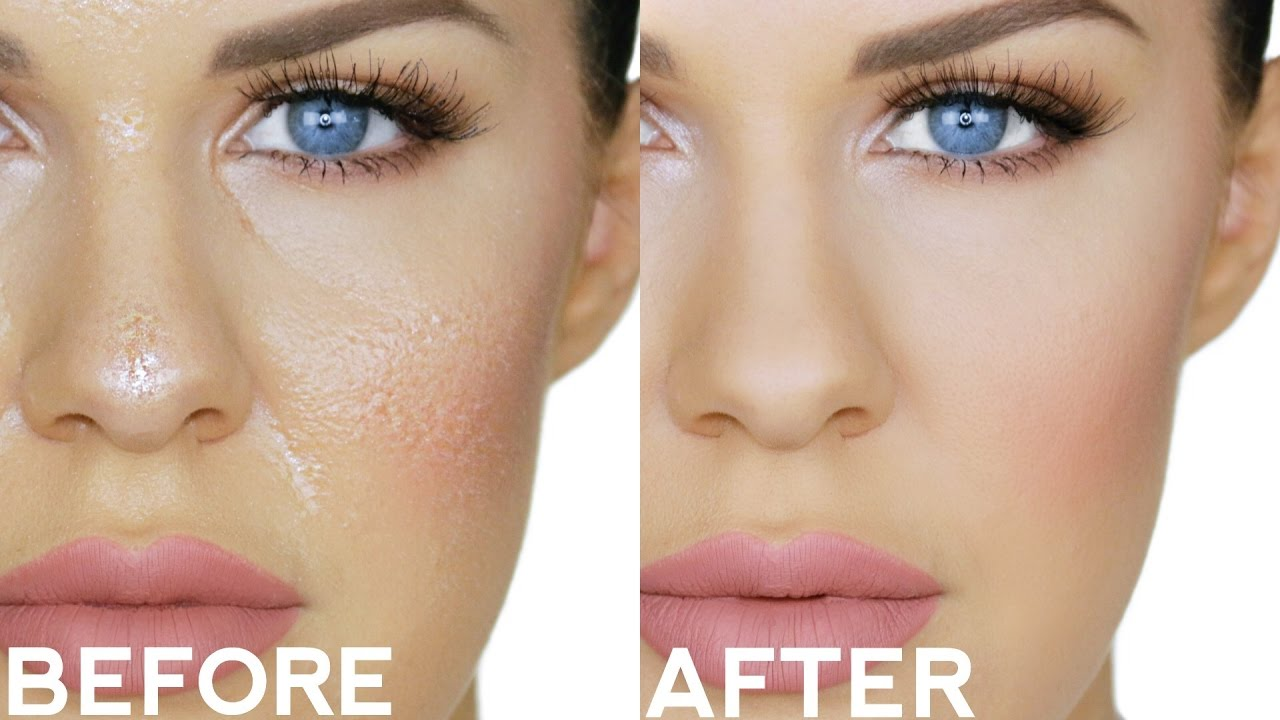
Try testing your lighting setup and seeing where your skin is a bit too shiny.
Just to be clear, this goes for men as much as women.
Then, apply a powder if needed. Your video (and you) will look a whole lot more professional.
Step 6. Edit — A Lot
Making videos is like any other skill. You will get better at it the more you do it.
Video editing makes your life a lot easier by making it easier to cut between the best takes to more rapidly built your content.
Video editing software is easy to find — and use. iMovie comes on all macs and is available as an app on iOS.
The drag-and-drop interface makes it a snap to use.
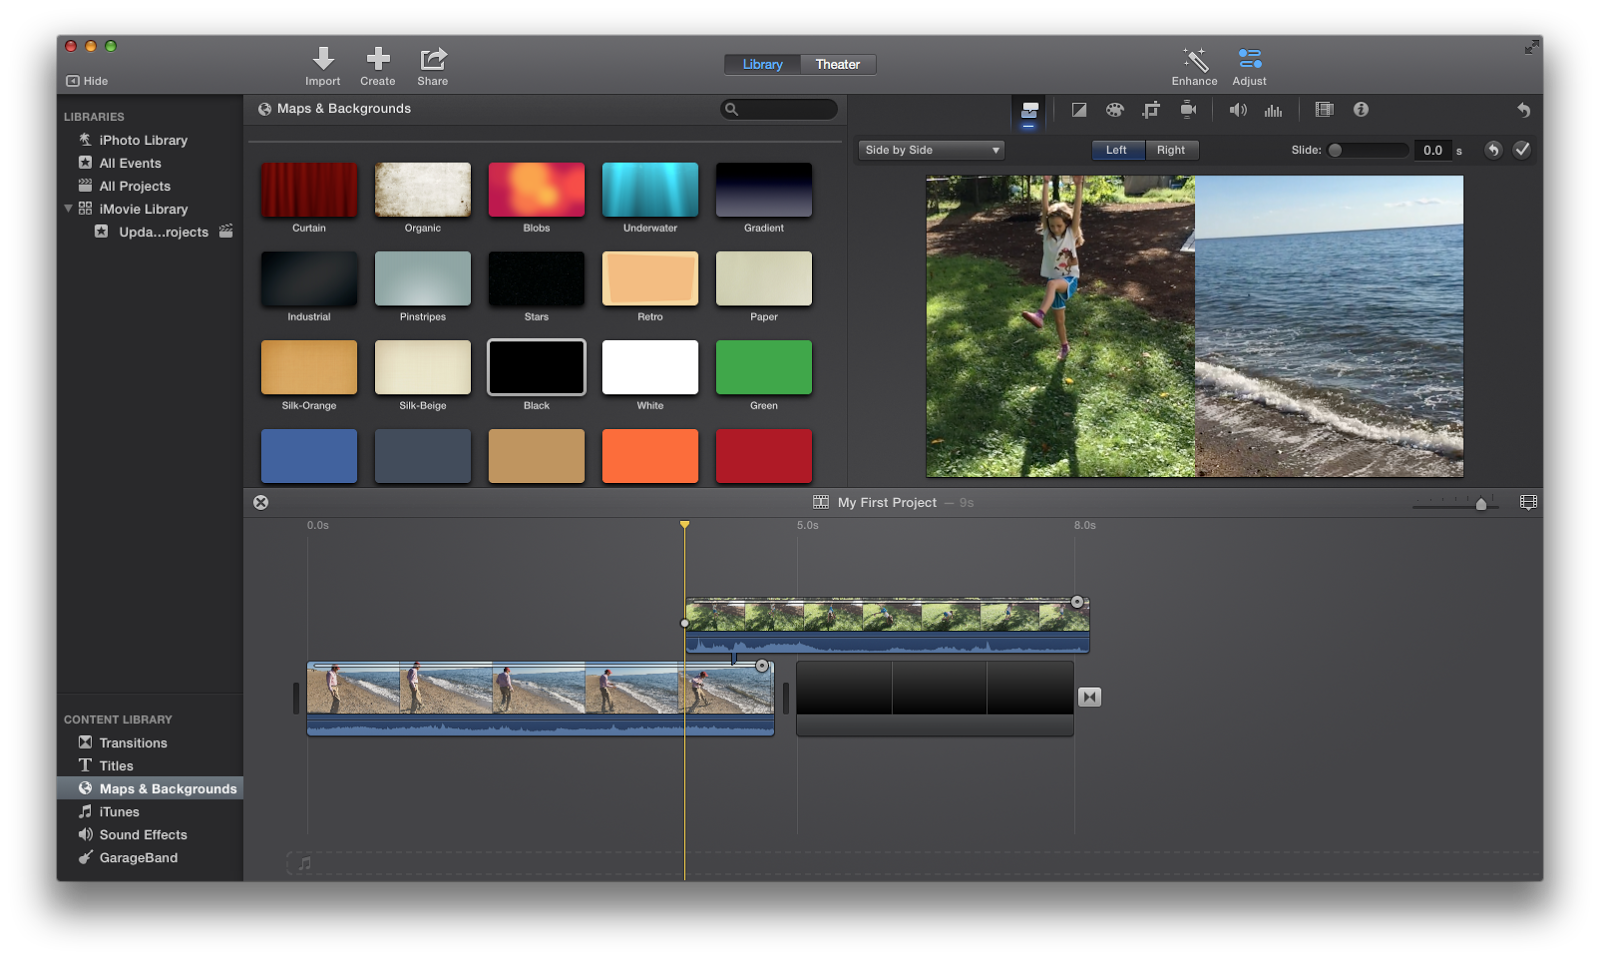
If you are ever wondering how to do something, like shorten a transition or overlay an image, there are tons of tutorials on YouTube.
The bottom line is that you should be creating a lot of content. The majority of it you might not even use. But you get better and better each time you try something new.
And you should be careful to avoid oversharing. Instead, you should focus on a more qualitative approach.
Even if you think you did something great the first time through, force yourself to try it again.
You never know when you’re going to stumble onto something great.
OK, you’ve got the keys to actually making your videos to execute your strategy, now comes the hard part.
How to Get People to See Your Vlogs
When you make a video, you are in control of everything.
You decide how much you can invest time and money into creating your video. You decide who you work with and what you want the outcome to be.
Then, you decide when you put it online.
You don’t decide when other people watch it.
You can only try to grab their attention.
Getting people to watch your video can be difficult, but there are many steps that you can take to maximize your potential audience and get more people to click play.
Step 1. Create an Awesome Thumbnail
The first thing that many people will see is the thumbnail on the player before they start the video.
In fact, this is the piece of communication that reaches all the people that come across your video but don’t play it.
That digital real estate is your little promo box and can drive engagement. Take the time to make it great.
Here are two examples from Gary Vaynerchuk. He varies the style of the thumbnail from a photo collage with the title in a fun YouTube-style:

To a more elegant and serious tone when his subject matter is more inspirational:

There’s one thing you will always see in the thumbnail though: the title.
It’s crucial real estate that you can entirely personalize to get people to click.
You will have to abide by the brand values and guidelines, but you should create something custom to make sure you are putting your best foot forward.
To add a thumbnail to your video, click on the video in your video manager.
Then, in the middle of the screen next to the player, you will see a few images that come from your video that you can select as your thumbnail.
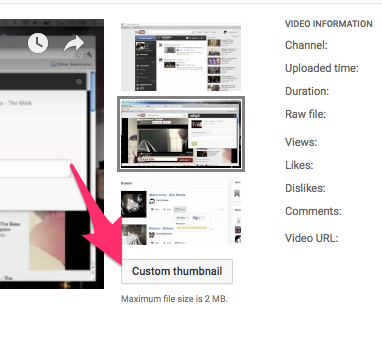
Click on upload image to add your own custom image. The best size is 1280 x 720 pixels. A 16:9 ratio works best since that’s the format of the layout.
But you have to keep your thumbnail under 2 MB.
Step 2. Optimize Your Video for Search
I’m not just talking about Google search here.
YouTube is the world’s second largest search engine by itself. All of those searches are powering an insane amount of views.
To optimize for search, you need to work on your descriptions. YouTube can’t crawl through your videos like Googlebot crawls through your website.
You need to lend a helping hand to get YouTube SEO right. Here are a couple of things you can do:
- Write a description of at least 250 words that outlines the subjects of the video
- Get your keywords in the description in the first few sentences, and use it at least 3 or 4 times in the body of the description
- Start the title of your video with your keywords
- Add tags. Tags help you show up in the related videos column when people are watching other videos.
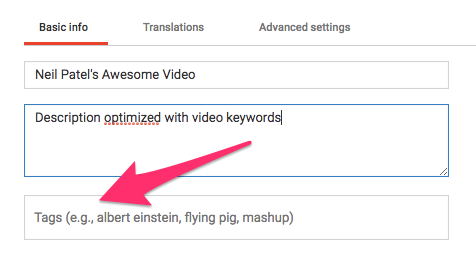
There are also a few of the advanced settings that are helpful to turn on.
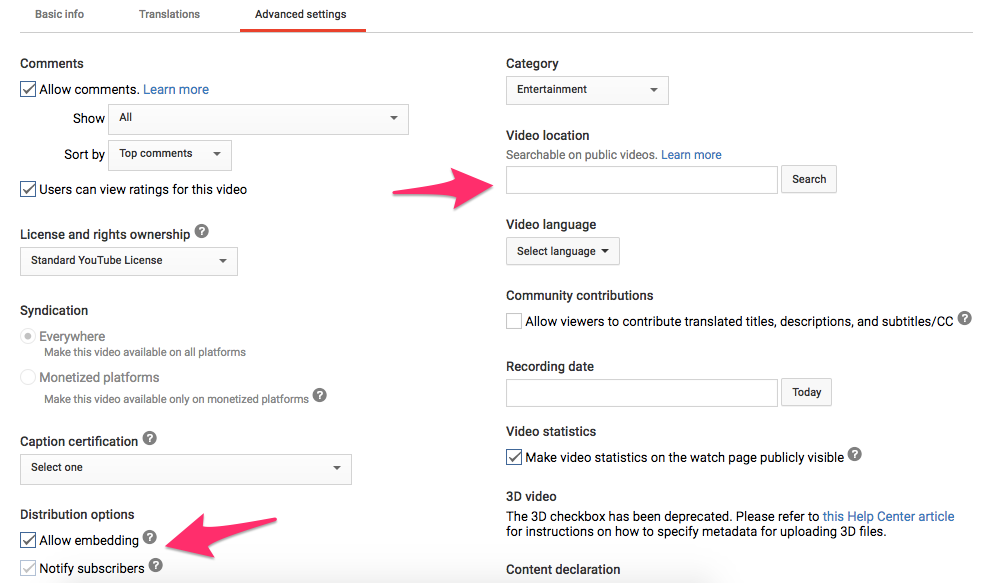
If your video is focused on a local area, you should add a localization to the video.
Then, you want to drive as many views as possible so you should make sure that the two options are enabled: allow embedding and notify subscribers.
This way people can share your video on their websites, and you can benefit from their traffic to drive views.
And wouldn’t it be silly if your subscribers didn’t know you had a new video? It’s checked on by default but just double check.
Step 3. Use End Screens to Promote Other Videos
Anyone who has watched your video to its completion is probably very interested in what you have to say. That is the best time of all to catch them.
YouTube developed end screens to keep people’s attention at the end of your video.
20 seconds before the end of your video, and/or for a bit afterward, you can present related or featured videos to your viewers.
To do that, go to your YouTube account and click on the video manager in the menu on the left:
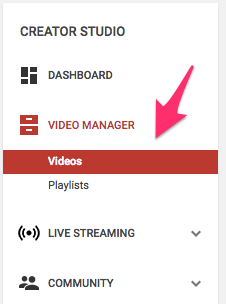
You’ll see a list of your videos. Click on one of them.
You’ll see all the options to edit your video, like enhancing it or adding audio. Select Editor, then Add an end screen.
The end screen adds extra time to the end of your video where you can do two key things: promote your other videos and get people to subscribe to your channel.
Click on the Add element button.
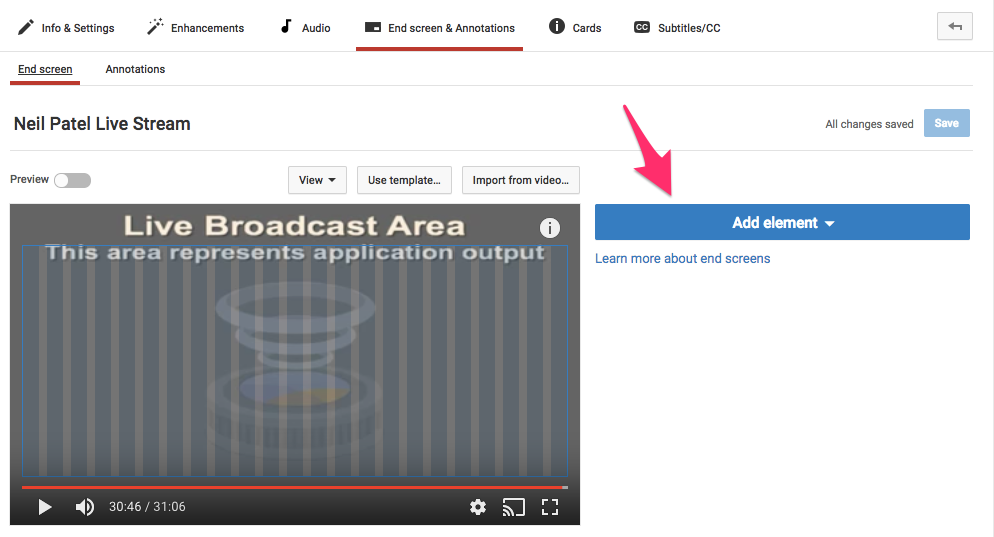
You’ll see a dropdown menu with a few of different options. All of them are great for driving traffic.
YouTube provides three options for promoting your other videos and playlists that are pretty great.
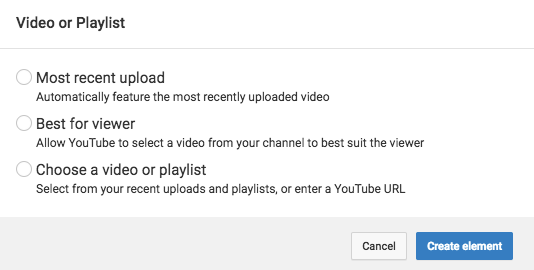
You can choose to feature your most recently uploaded videos, or you can choose a specific video that you want to promote.
Or you can let YouTube do the work and automatically recommend videos from your channel that would be the most relevant for each viewer.
You could even link out to other people’s videos if you want.
When you add a video, it will display the thumbnail plus the title and the duration of the video:
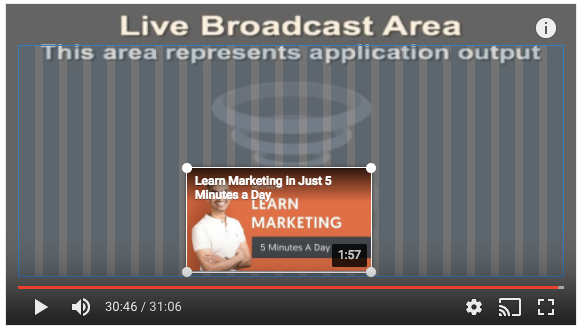
You can reposition and resize the video.
You can add up to four elements to expose people to as many of your videos as possible.
Step 4. Get People to Subscribe to Your YouTube Channel
If you want to create a successful vlog, you need to increase your subscribers.
Views come and go.
Subscribers are more than people that happened to see your video.
They are people who were so happy with that video that they want to see more. They are anticipating that you will give them something great again.
What’s more, media outlets and brands looking to partner with vloggers will use subscribers as their key metric when evaluating opportunities.
The most important is adding the subscribe action. When you do you will see your channel’s avatar in a round circle.
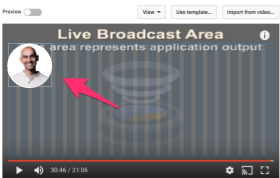
You can position this button wherever you want on the screen.
You can also use the end screen we discussed above to increase subscribers.
Don’t forget to add a link to subscribe to your website, email signature, and Instagram bio. It’s not just enough to add the YouTube link. You should tell people something clear like “Subscribe to see more videos.”
Step 6. Go Live
Live video is the new wild west in digital marketing. It represents a lot of opportunities. It’s much easier to be featured on the Live home page than the regular YouTube homepage.
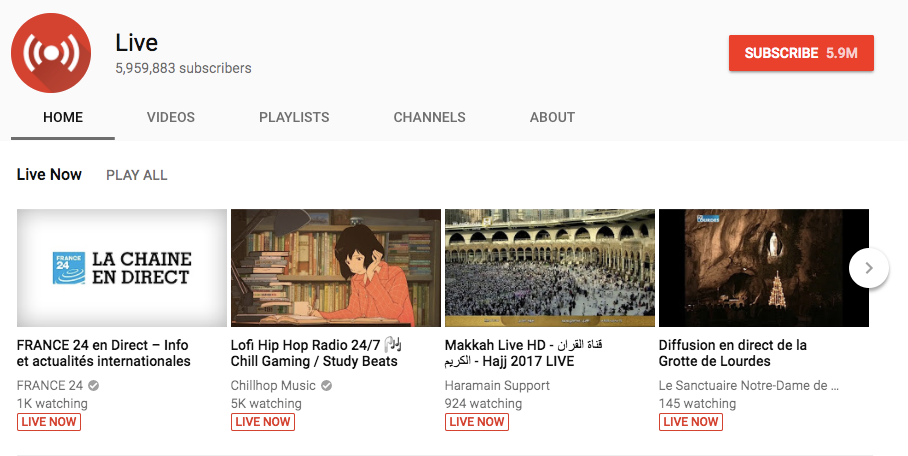
I’ve written all about how you go live on YouTube and why it’s important.
Live also gives you the opportunity to interact directly with people while they watch you.
You can instantaneously respond to people’s questions that come up in the chat. This creates a real-time relationship.
Conclusion
Video blogging is becoming more and more important for content marketing.
And there’s no time like right now to get started in video marketing.
Organize your thoughts, sit down, and create a concept for a video series.
Like all content marketing, your video needs to give the viewer something of value, whether that be informative or educational or entertainment.
Then, make that video with the highest quality that your time and budget allows.
If it’s helpful, read some books about cinematography. I recommend Gustavo Mercado’s The Filmmaker’s Eye. You can skim through to get the basics about things like shot composition.
Finally, whatever you do, don’t forget to get your video in front of people.
You could make the best video the world has ever seen, but that won’t make you a successful vlogger.
What are your experiences with vlogging?
The post How to Become a Successful Vlogger appeared first on Neil Patel.
from Blog – Neil Patel https://ift.tt/2wxSIrK
via IFTTT
No comments:
Post a Comment